Tuesday, March 12, 2013

Digging along the fence, Part 2

We are continuing to dig along the fence, the objective being to put a cement wall down under the fence, with a white stone top, as a barrier to anything going under the fence.

Progress is slow, as the following pictures show.  Each one is a day's work.


We had a 4 inch rain, and then more rain.  I can't work in the mud.


Thursday, January 24, 2013

Repairing a garage door

When I came home last night, and tried to open the garage door, it got halfway up and jammed, at a small angle.  Experience suggested this was a broken spring.  It was.

There are two coil springs on each side of each of the two garage doors.  Gravity pulls the garage door down, and expands the springs as it does.  The springs then help pull the door back up when it is opened. 


These original springs were installed when the house was built (1986).  They tend to break at the ends, and looking at the breaks, the steel they are made from is cast steel.  Repairing them is just replacing the springs.


One problem is what size of spring to get.  I went to Home Depot and found the garage door opener section.  They had springs from 70 pounds to 160 pounds.  This should be a measure of how much the door weighs.  You want a spring which roughly pulls back with a little less than the force of gravity pulling the door down, so that a little work will bring it up (spring plus work exceeds the pull of gravity) and a little work will bring it down (gravity plus work exceeds the pull of the spring).  If the pull of the spring is exactly equal to the pull of gravity, the amount of work needed to open or close the door is minimal.

Not knowing the weight of the door, I picked 140 pound springs.  I think at one point I tried to weigh the door, but that's not easy.

The box from Home Depot comes with two springs, plus safety cables.  The safety cable runs down thru the length of the spring, so that if it breaks, most of it is held, more or less, in place.  The spring almost always breaks when it is extended, and will then shot back towards the anchored end with a lot of force.  Plus the broken piece can go shooting off too.

It took half a day to replace the two springs, plus two trips to Home Depot.  In addition to the springs (first trip), I needed two Steel S-Hooks (2 inch size) to attach the end of the spring to the garage door support -- a piece of slotted angle iron, one for each door.


The box comes with two springs, so I replaced both of the old springs on this door at the same time, and installed the new safety cables.  Then I lubricated all the moving parts and tightened all the bolts.

The springs on the other garage door were replaced earlier.  Now we have new springs on both doors.

Thursday, January 17, 2013

Planting Maggie Rose

Linda's vision for the South Bed includes roses along the stone wall, so we bought a "Maggie" rose and planted it in the corner of the fence and the stone wall.  We tried to plant it far enough from both the fence and the stone wall that it will have room to grow up and out.


This is a 2 gallon size, Maggie Rose -- it's labeled as rosa x 'maggie' for $16.99 from Barton Springs Nursery.


Sunday, January 13, 2013

Repairing the Rainbarrel

While working on the walkway, on one cold morning, I nudged the hose leading from the rain barrel, and broke off the little nozzle at the bottom of the rain barrel to which the hose was attached.  This was unfortunate, since the whole rain barrel appears to have been made as one big solid piece.

I figured the best way to repair the rain barrel was to drill a hole where the nozzle had been and insert a new nozzle.  I found something like this at Home Depot.


 This is a barb on one end, suitable for slipping a hose over it, and 3/4 inch threads on the other end.  So now I needed to drill and thread a 3/4 inch hole.  Turns out I have a tool to create the 3/4 inch threads from my work with the PVC underground irrigation work:


 This has 2 or 4 different threadings, one of which is just what I needed.  So after drilling a smaller hole first, and then expanding it with the threading tool, I was able to get the adapter screwed into the rain barrel, and re-attach the hose.


An alternative, if we need one in the future, is to put in a brass adapter, but with a plastic rain barrel, a plastic adapter seems reasonable.

Thursday, January 3, 2013

Refrigerator Shelves in the Garage

We needed to get a new refrigerator and since the old one didn't work anymore, and was going to be trashed, I removed the shelves from old fridge, and have mounted them on the wall in the garage.


The shelf supports are rather short.  I installed a new 1x4 across the wall (the white one at the bottom of the shelf supports) to provide something solid to attach the shelf supports to.

Monday, December 31, 2012

Digging right to the fence in the backyard

We will continue the approach of putting a mowing strip along next to the fence.  In our case, we dig down to bedrock and pour a concrete wall and then cap it with a limestone brick.  The first step of this is to dig down to bedrock.  We have started that.


We will continue this along the fence over to the rock wall, and then start pouring concrete.


Monday, December 24, 2012

Second part of the final pathway walls

We continue pouring concrete to define the pathway.   We want the pathway to be about 36 inches across, so we pour the other side of the pathway accordingly.  First we put the forms up.


and poured cement in the forms.


We removed those forms after a day,


and moved them on to the next section


poured more concrete,


and did the same for the last section.


This gives us a complete walkway pair of walls, going from the completed part of the walkway, around the patio wall, and forming a smooth curve that should be easier to mow along.


This completes the current phase of pouring the concrete walls.  The next step is to fill the space between the walls with rubble rock and then top it with limestone blocks along the walls, and decomposed granite for a walkway base.  And we can start filling the pit back in with dirt, mixing it in with all the leaves and grass clippings that we have accumulated over the past month.


Monday, December 10, 2012

Restarting the irrigation system

It's threatening to freeze outside, and the radio says that plants survive a freeze better if the ground is wet.  Our city-allowed day to water is coming up (Saturday), so it might be best to water before the freeze.  Unfortunately, when we had the water line electrical wires extended, the wires may have been mixed up, so we need to determine which wire controls which zone.

This is time-consuming, but not difficult.  We turn on a zone at the controller in the garage, and then walk around to see what zone is actually running. We do this for each zone, until we have a complete mapping from the old zone numbers to the new zone numbers.

OldNew
11
22
33
49
58
67
710
85
94
106
1111

Once we have this table, we can see that to restore the controller to its previous zone definition, we need to
  • Switch the wires for 4 and 9
  • Switch the wires for 5 and 8
  • Move the wire from 6 to 7, the wire from 7 to 10, and 10 back to 6.
With these changes, we now have a working controller, with all the zones the same as before, and we can water.

Wednesday, December 5, 2012

New Refrigerator

Our refrigerator died.  I opened up the freezer to get ice and found most of the ice had melted.  It's at least 15 years old, and was on our list to replace, so it was not unexpected.  It did mean we had to throw out almost everything in the refrigerator and freezer, but there certainly could have been worse times for it to die.

 So Monday night we went out looking for a new refrigerator.  Using Consumer Reports evaluation, we were looking for either a Whirlpool or Kenmore.  Our first stop was at Fry's Electronics, and we soon narrowed our choice to a Whirlpool refrigerator with the freezer on the bottom, and French doors with an ice-maker in the door.  We ended up with model WRF989SDAM00.

We arranged for it to be delivered on Wednesday.  Tuesday night I emptied out the old refrigerator -- luckily Wednesday morning was also our garbage pick up day.

First the installers took out the old refrigerator.


To get the new one in, they had to take the front door off it's hinges.  The new fridge came in the front door, thru the living room and into the kitchen.  To get around the kitchen island, they took it between the island and the dishwasher.  I took the dishwasher handle off.


Once the new fridge was in place, they hooked up the water supply for the ice maker, slid it back into place and plugged it in.


I spent the next hour or so taking off all the protective tape and plastic wrap, then washed out all the drawers and bins and shelves.
 

 But by the end of the day, we have a new refrigerator.  


 This replaces everything but the cabinets and the microwave from the original construction.

Trying to use the new refrigerator, they say to throw out the first 3 bins of ice and to flush 3 gallons of water thru the water dispenser.  It takes time for the ice, but I can do the water dispenser now.  When I start to use it, I find water on the floor.  Tracking it back, it's flowing down the side of the door gasket, and coming from the hinge at the top of the refrigerator.


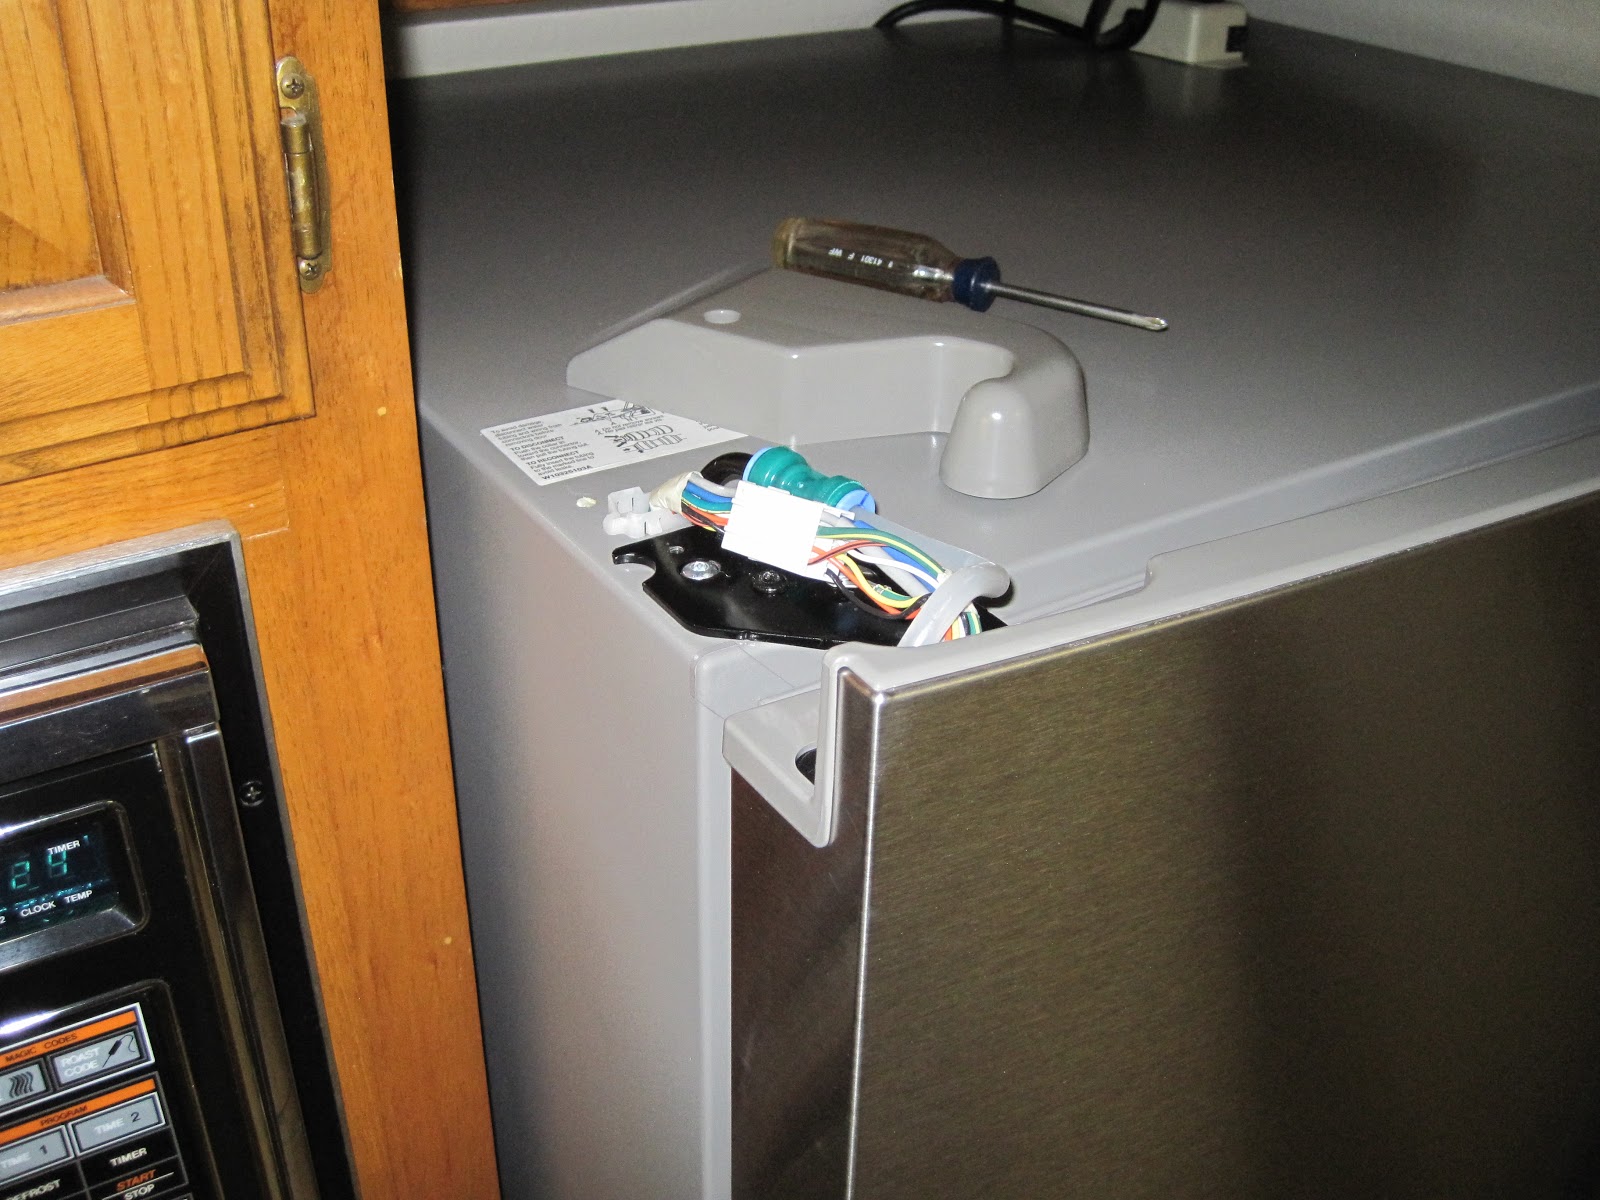
Using a Phillips screw driver to remove the hinge cover, we find both wiring and a clear plastic tube to carry the water.


And the clear plastic tube has a hole in it.  Looks like it has been bent too much or too often.


Since this is a brand new refrigerator, I call Fry's.  They say to call Whirlpool.  Calling Whirlpool customer service, I get Kitchenaid, who says they are also Whirlpool.  Customer service wants to identify the specific part  that needs to be replaced, to decide if this needs a technician, or can be done by the customer (me).  So they transfer me to a separate company who handles all their parts (Marcone Supply), but they can't determine exactly what part it is, and transfer me back to Whirlpool/Kitchenaid.  This time they greet me as Amana, and says they also are Maytag.

In any case, they set up for someone from A & E Factory Service to come out on Friday morning (8 to 12).

On Friday, a technician shows up, agrees on the problem, but does not have the part on his truck.  He orders the part --  will be shipped UPS directly to my house --  and schedules for someone else to come out next Thursday to do the replacement repair work.  In the meantime, "don't use the water".


Digging up Zone 2

With the start of the cement for  the wall for the pathway poured, Zone 2 is completely defined.  So we can begin taking out the remaining rocks and providing better dirt.

We start digging out the dirt, to get down to the rock, mixing the dirt with some of the Fall leaves we have been collecting.


As we dig the dirt out, separate out the rocks, and mix in the dirt, we move it so that it fills in the parts of Zone 2 that we had dug out.


 We cannot get all of the rock out, since some of it is directly under the Chinese Pistache.   We are getting in as close as we feel we can.  If the tree dies at some time in the future, we should dig down and get the rest of this rock out.