Back in January 2000, we put a big sink in the garage. It was just temporary to see if it was useful. There had been a small sink on the exterior wall. We got a pre-fab cabinet and a big plastic sink, and put it in the corner next to the door to the kitchen. It's worked out well -- seen lots of use. But the wall above the sink keeps getting wet and then dry, and the paint is flaking. Plus the cabinet (cheap press board) is starting to come apart. So it seems time to make it permanent with quality materials.

The first problem is the wall. Since it gets wet, a tile wall would be best. I noticed a tile wall at a local sandwich shop (Snarf's) that I liked, so I went looking for that and found it on the internet. We planned to tile the entire back and side wall, so basically 8 feet high by 8 feet wide (3 feet on the side and 5 feet on the back). We bought 70 sq feet of the tile, from FOC Tile (thru Paypal) for $1408.59.

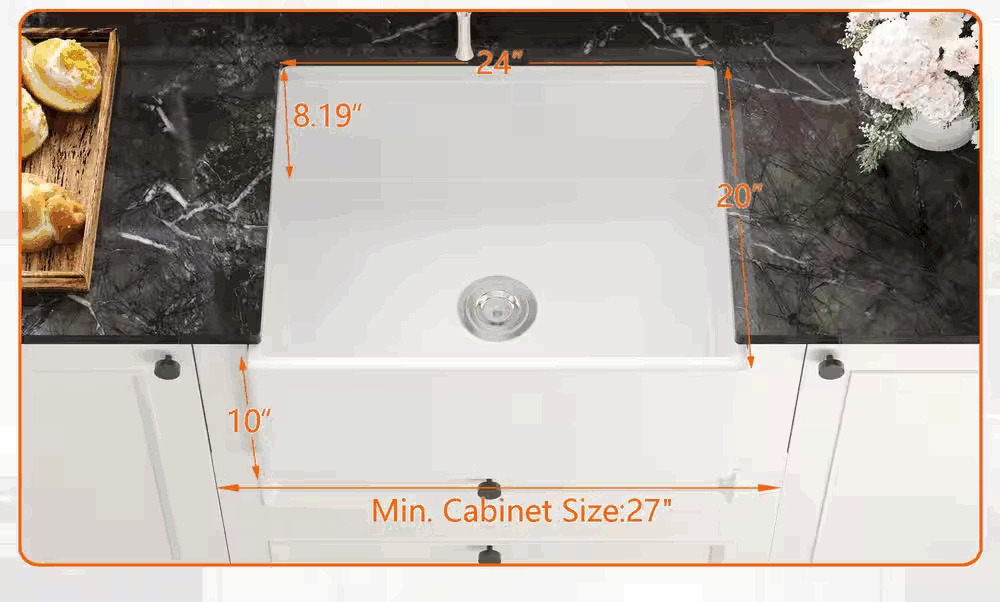
And we also need a new sink. That was more difficult. The old sink was very large, and deep, but plastic. There are few sinks of that size. We finally found a 24 in. Farmhouse Single Bowl White Fireclay Workstation Kitchen Sink made by Deer Valley sold by Home Depot ($306.24).
But I had had a good experience with Joshua Dickson from Meadow View Construction when he came out and did the trim work for the 3rd return air and under the granite countertop in the kitchen, so I discussed it with him and we came to an agreement that he would do the work, for $4,133.
I removed as much of the stuff in way in the garage (the towel rod, the overhead shelf), and emptied the cabinet. Then came demo -- remove the old sink and cabinet and open up the wall for the plumbing.

Since we are tiling all the way to the ceiling, we will replace the sheetrock wall with Hardie board, so remove all that sheetrock.

Next, Josh moved the hot and cold water lines, and the drain line to be in the wall, over where the new sink and faucet will be installed. And then install the hardie board as the new wall.

I bought a roll of fiber glass insulation from Home Depot and put it in the exterior wall before it was covered with hardie board, just in case that helps later.
Once the walls were coverd with hardie board, and it had been properly sealed against water, Josh could start installing the tile.

This took several days, putting up a couple feet of tile, and then waiting for it to dry before going on to the next section

and the next

until the entire wall was tiled.

Once the tile was on the wall, it was grouted, and sealed.

It looks much better all cleaned up!

In the meantime, I drew up a design for the new cabinets, using my best high school drafting skills.

Jaimes Cabinets agreed to make them, for $1400, using solid plywood. They did a great job and I picked them up, brought them home and put two coats of polyurethane on them.

Josh then installed the cabinets and installed the sink in place.

The sink sticks out a bit (2 inches) from the cabinet (the "apron" part).

Next, we need a countertop. We noticed a brochure at Costco that they do countertops, so I called them. Costco put me in touch with Toor Stone Countertops. We decided on a Quartz material, in Blanco Aspen (white) color. $919.03. They sent a technician with a laser system to measure the sink, cabinet and walls to define what the countertop should look like.

After about two weeks, Toor showed up to install the countertop. It took 4 guys.

Despite the laser measurements, it didn't quite fit the walls, shoving it over too far to the right for where the sink is. As a result, they needed to trim off an edge two or three times to get it to fit. They used a silicone caulk on the wall/countertop joints, and also all along the top of the cabinets. Then they applied more to the counter top/sink joint.

Before they caulked everything down, I drilled a 2 inch diameter hole in the shelf under the sink, behind the sink, below where the hole for the faucet was drilled. That allowed me to put the new faucet (Delta Classic Model 19810-SS-DST) in place. Unfortunately all the tubing underneat the sink (the hot and cold water lines, plus the hose for the spray) did not reach down below the sink, so I had to enlarge the hole in the shelf, in order to get my hands up into the space behind the sink, and get things installed. The faucet itself had to be bolted down to the counter top.
Then the hot and cold water lines were attached to the cut-off valves that Josh installed. Finally the spray hose had to be attached, with a weight on the hose, to allow gravity to pull the spray head back into position after it is used. All this while lying on my back with my hands in the hole behind the sink working in the dark.

But after hours of work, I got it all installed.
This is a workstation version of the sink, so it came with various extras -- a cutting board and mesh flooring, I'm not sure how those will end up being used, but it gives it a touch of class.

While getting things put together, I noticed that the grout didn't fully cover the space around the light switch.

That required getting some more grout (Egg-shell white), and carefully filling in the missing spots.
