We noticed some time ago that the weather stripping on the sliding door to the deck from the living room was starting to come apart.

This is an Andersen Door, so we went to the Andersen web site to try to determine what piece needed to be replaced. They call it a "gliding door", not a "sliding door".
According to their information, what we needed was the Interlock Weatherstrip.
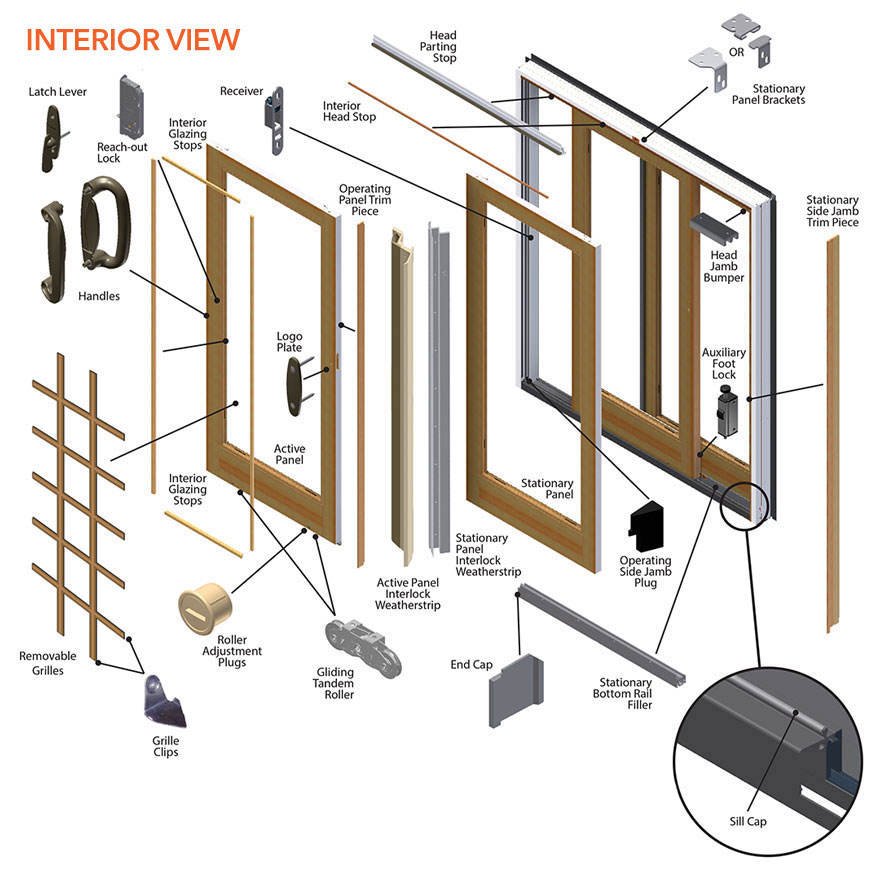
which comes as a kit, the Interlock Replacement Kit, which contains the Active Panel Interlock and the Stationary Panel Interlock. $46.81 from their parts department in Minnesota. To make sure that we get the correct set, there is a set of numbers in the upper track that identify what we have:

Unfortunately, their computer system could not understand these numbers, so I had to call and talk to someone. He took the order. The only issue was what color. I know the inside is an Oak, but the outside is sort of a grey? That was fine, we got the order. Turns out there are two greys. A light grey Sandtone, and a darker grey Terratone. We have Terratone, and they sent Sandtone. But it is almost not visible, so we went ahead.
They seem to have redesigned the Interlock, so both pieces have to be remove and the two new pieces put on. And a small part of the stationary door needs to be modified to allow the new design to be installed. There is a very well done video showing how to replace the Interlock, called "Replacing an Interlock Weatherstrip on Gliding Patio Doors (Frenchwood and Narroline) | Andersen" on Youtube, that shows the whole process. Plus there is a printed guide that comes with the Interlock Replacement Kit. It is almost enough to understand how to do the work.
The main work is with replacing the two pieces on the stationary and active panels. Since the new pieces use the same screw holes as the old pieces they can be positioned pretty easily. But there are little plugs and pads that go on the top and the bottom which are more problematic. The video and instructions basically say, remove the old plugs and pads and install the new ones, but do not give a detailed picture or video view of how that should be done. The head dust pad, for example can go on the door panel or on top of the interlock piece, and it is not clear which it should be. Similarly they send two Sill Dust Plugs -- one for a right hand door and the other for a left hand door, but really do not indicate how to tell which one to use. It goes at the base of the stationary panel, which can be on the left or right depending on whether you are looking out from the inside or in from the outside. Since all the work is done from the inside, I assumed we have a left hand door. Oh wait, does the left/right refer to the stationary door or the active door?

There were other unstated issues. Since the active panel needs to be taken off, the door is open for the time it takes to do the repair. We picked a warm day, so that there was no heating/AC issue, and although it does not say so, you can leave the screen door on all the time, which takes care of the bugs.
The instructions say to take off the oak trim on the active door, but if you look, you see that the only reason you have to do that is because the interlock piece wraps around the corner and under the trim. Since the old and new interlock pieces are the same thickness at that point, I could just pry the old piece out from behind the trim and jam the new piece under the trim, without removing it.
Also, the door was unfinished under the old interlock piece, so we took the opportunity to apply a coat of poly-urethane to finish it.

The whole process took about 3 hours.
But it also exposed that the weatherstripping on the other side -- the jamb side -- of the sliding door also needed replacement.

There are two pieces of weather stripping -- the exterior one and the interior one. I thought I only needed to replace the exterior one, but for some reason ordered the interior one (Andersen Windows part 264140, $23.37 including the new glue plus shipping), so I had to go back and order the exterior one (Andersen Windows, part 2641416, $17.71), and figured I may as well replace them both at once. The description of doing that is easier than the practice of doing so.
First you remove the old weatherstripping. It is glued on, so I used a putty knife to get it started and then just pulled it off.

Then while the instructions said to remove any excess glue, it was not clear how to do that. They said to use a clean cloth and alcohol, but that just seemed to clean it -- nothing seemed to remove the old glue.
Then it is simply applying the vinyl to vinyl adhesive to the weather stripping and putting it in place. That was not too bad for the outside piece -- the main problem was trying to hold the weatherstripping while also applying the glue to its entire length while not touching it to anything, and then slipping it into place.
The interior piece was more difficult. Not having paid quite enough attention to how the previous piece was attached, there were at least two ways to place the new piece, one of which looked right until it was in place and then was clearly wrong. In addition the interior weatherstripping is less complicated, hence lighter weight and tended to keep slipping down the door as I tried to apply it. Maybe I should have started at the bottom and went up, instead of at the top and went down. And there is always the question of whether I am putting on too little or too much of the glue, which is only revealed by it not sticking well enough, or having too much glue oozing out as it is pressed in place. In the meantime, it becomes apparent that the glue dissolves both pieces of vinyl, at least a little, to bond them as the solvent evaporates, so this will not be easy to repeat.
But it is done and is definitely a tighter fit, enough to make the door harder to open and close.


