Wednesday, December 29, 2021

Replacing an Expired Nest Protect Smoke Detector

 Smoke detectors age and stop being effective after about 10 years.  In 2015, we installed a Nest Protect smoke detector, and in October 2021, it started warning us that it was going to expire.  But the messages were being sent to an unmonitored e-mail address, so I didn't notice until just now.

The first Nest we put in was a Generation 1 battery operated unit, and those only last 7 years.  So 2015 + 7 = 2022, but it was manufactured in 2014, and installed in January, so close enough.


 All of our other Nest units are wired into the house, not battery powered, and we considered replacing it with a wired unit, but maybe it would be good to have a variety of battery and wired units, so we went looking for another battery unit.  We found them at multiple sources, but all at the same price, so we went over and got a replacement from Home Depot.  $128.82 (after sales tax added).

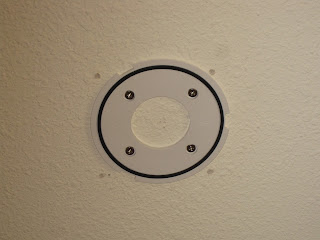
Removing the old unit just requires twisting it off, exposing the mounting ring.


The new unit is 2nd Generation (so it should last 10 years), and they might have used the same mounting ring.  But they didn't.  So we have to remove the old mounting ring and install a new one.

Then we need to activate the new one.  Which requires the old one to be de-activated first.  We can hold the button down on the old one for more than 10 seconds, and it resets itself to factory conditions, removing all our info.  Then I can turn it over and remove the batteries to turn it off.

The new unit has a QR code on the back to scan with the Nest app on my iPad, and after selection the language (English) and giving it a name (Living Room), it communicates with the other Nest units to learn the Wi-Fi information and set itself up.

Then it can be put up on the ceiling.

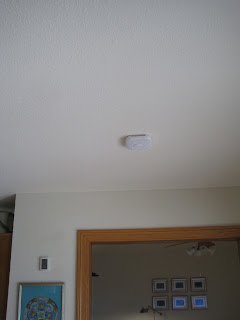
The unit itself is the same size as the 1st generation unit, so it covers the holes from the old mounting ring.

At least at the moment, it seems to be confused between the old unit and the new unit, since when I press the button, it still says the Living Room unit is expired, but I assume that will go away in a day or two at most.


Thursday, November 25, 2021

Excavating the Front Flower Bed

There is a bed in-between the house (the front bedroom) and the retaining wall for the front yard.  This has had Nandina for years.  In fact, we excavated this bed once before, in 2008, and just avoided the Nandina.  However, Linda says that Nandina is (a) non-native, and (b) invasive, and so we removed it. 

And having removed it, we can now excavate the entire bed to improve the dirt and remove rock.

We started in the corner, near the door, but soon realized that would be difficult to expand.


 So we moved down to the far end and started digging there.  We know that we did a lot of work when we removed the Mountain Laurel, so we just started next to the Turk's Cap.

Expanding the digging back towards the front porch.

Most of the dirt we dug out went in a pile on the front lawn, near Fuzzy, but eventually we started back-filling the area we had dug with the dirt, mixed with leaves.


As we got closer to the front porch, we uncovered an elevated section of rock.

which we broke up with the jack hammer

and removed.

That allowed us to dig out this rock 


and keep going until we reach the front porch.


At this point we can put the dirt back in place, mixing it up and adding a large number of Fall leaves to improve it's quality.


In doing this, we also rebuilt the sprinkler line.

And then buried it again but a bit further down.


Wednesday, October 27, 2021

Removing Two Elm Trees

 The February Freeze killed the Monterrey Oak tree, but it also caused a lot of damage with the Elm trees on the other side of the house.  There was the possibility they would recover, despite the damage, but by September it seemed clear that at least two of them would need to be removed.


We got a couple of quotes, and chose Good Guys Tree Service, who did the air-spading work, to remove the trees.  $2850.  As with the other tree work, it took about a month or so from when we said to do the work for them to show up.

But they showed up on Wednesday, about 2:30 pm. and got right to work.  There was a crew of 7 guys.  Some worked from the roof; some from the ground; some from in the trees; some for the neighbor's yard.

They started with the older, larger tree in the middle,


, removing limbs and trimming it back to just one large trunk.

 And eventually even that trunk came down.


Then they did the same to the other tree.


By 4:30, both trees were down and all the branches, trunks, and wood was cleared off.


leaving only two stumps in the ground


We will see how the Texas Sedge and Inland Sea Oaks recover.


Tuesday, October 26, 2021

Rock Wall around Fuzzy

 Once the air spading is done, we know how to work around the roots to construct a retaining wall around Fuzzy.  That will allow us to bring in more dirt and improve the slope of this section of the front yard.  Of course, we have a sort of mock-up of what the wall will look like.


but now we want to do it for real.

To define where the wall would be, we use a string and stakes to lay it out and get it level.  We tried draping the string with plastic, to get a better idea of the placement, but I think that was of limited benefit.


We begin on one side.  We have to dis-assemble the existing mock up, both to give us room to work, and for the rocks to use.


Then we start to work across the yard, from the sidewalk towards the driveway.


Selecting and placing the rocks.

Sometimes we have to remove some rocks and start over with different ones, but we continue to the corner and then up next to the driveway.

Then we roll the extra rocks up out of the way


And we move the sprinkler head near the driveway in the middle of this section of the yard to be in the corner of the terraced bed.


Then we rent a pick-up (from U-Haul, $62.98) and make two trips to Whittlesey Landscape for 2 cubic yards of professional mix (2.5 for the second trip) $105.36 and $128.67.

Our computations said we needed about 4 cubic yards -- a wedge  11 feet on a side, 13 feet wide and 16 inches tall -- but the two trips seem to fill it pretty well.


Thursday, October 21, 2021

Air Spading around Fuzzy

 The live oak planted in the front yard, between the driveway and the sidewalk we call Fuzzy.  The last section of the house to dig up is from Fuzzy to the house.


Our experience with the Spanish Oak in the front yard, and, to a lesser extent, the Monterrey Oak in the back, is that trees are not happy when you dig around their roots, and even when you try to stay well back, they can die.  We don't want that to happen to Fuzzy, so we want to be very careful of it's roots while planning and digging.

Our plan is to terrace the area under Fuzzy, just as we did on the main front yard, so that we provide more, better, dirt for Fuzzy's roots.  We have a temporary retaining wall around it, and just need to make that permanent.

What do we need to protect, in terms of Fuzzy's roots?  Searching, we find something called the Critical Root Zone.  The Critical Root Zone for a tree shows how far out you need to be to preserve the roots.

This picture is for a 20-inch diameter tree; Fuzzy is about 22 inches, so measures should be about 10% more.  But certainly 1/2 CRZ at 11 feet is a point we should try not to disturb.  Which means we can put our retaining wall at 11 feet (from Fuzzy).

We marked off where the wall would go then.


But to put the wall here, we need to know where the major roots are, so that we do not damage them in the construction of the wall.  And this is where Air Spading comes in.

Air Spading is basically using high pressure air to break up and move the dirt.  While it is enough force to break up the dirt, it is not enough to hurt the roots, so it removes the dirt, but leaves the roots.  It basically is like a high pressure washer, but with air instead of water.  It takes a big compressor and a special air spading nozzle.

There are a couple of companies in town that advertise they do air spading.  We contacted two.  The person from the first company was uncertain how it worked, and what it was for, so they priced it at $350 for the first hour and $150 for each hour after that.  The second company, Good Guys Tree Service, understood what I wanted, and priced it at $700.  We went with Good Guys, since they apparently had more experience.  Their estimate said:

"PLEASE NOTE THE FOLLOWING: Airspading is a necessarily dusty and messy task that is designed to protect and prevent damage to the tree's root system. Dirt particulates, small rocks and materials may be jetted up to 50' from project area.  Large Stones, Objects, or any other discoveries that will not be displaced by the air jet will be left as found. Exposed roots should be re-covered with a light layer no more then 3/4" thick of hardwood mulch within 2 weeks of airspade exposure."

They took about an hour to do the work.  They showed up with a pick-up truck towing a large compressor, attached a hose to the compressor, and the air spade to the hose and went to work.

The result was a trench blown out of the dirt, exposing the roots.  Dirt everywhere!


(I expect that the soil being pretty dry helped.)

This exposes the root very well.  We can see that there are some large roots, especially on both ends of the trench.


while other sections have much smaller roots.


Wednesday, October 6, 2021

Planting the Front Yard

 Linda has selected a number of native plants and grasses to plant in the front yard.


The bulk of the area is to be a form of prairie grass developed by the Lady Bird Johnson Wildflower Center.  We have sown it over much of the front yard. It is a mixture of Buffalo grass, Blue Grama, and Curly Mesquite.

 Before we were aware of this, Linda had separately sown some  Blue Grama, and so our mix may have more of that than the Wildflower Center.

 In addition, she wants to put a set of taller grasses in the back:  Mexican feather grass, Lindheimer muhly, Bamboo muhly, Gulf muhly and Sideoats grama.  Then we planted some Bluebonnets. 

And she planted a bunch of other native plants:  Blackfoot daisy, Gregg's mist flower, salvia greggi, Barbados cherry, mealy blue sage, purple coneflower.


Update, May 2022:  most of the plants have grown quite nicely, especially the buffalo grass, and the bluebonnets.


But we noticed a bug on the bluebonnets.  Then another. And another! 


We looked it up and it is a Conchuela stink bug.  We have captured about 120 of them in the bluebonnets in our front yard.


Update, June 2020:  The bluebonnets are gone to seed, and the temperatures have reached 100 degrees, but the front yard is holding up well.


Monday, September 20, 2021

Final Dirt for the Front Yard

With the sprinkler system and heads installed, we could order the final layer of dirt for the front yard.  Working from the estimated size of the front yard (1370 square feet) and the depth that we were missing to the top of the stone retaining wall (from 2 to 6 inches -- assume 4 on average), we computed we needed 17 cubic yards of dirt.  

Plus we would like to cover the spot in the back yard where the Monterrey Oak had just been removed -- a semi-circle with a radius of 11 feet about 2 inches deep.

So we ordered 18 cubic yards of dirt from Whittlesey Landscape Supplies.  The price of dirt has significantly increased -- $47.85 per yard for the Professional Mix we use, plus delivery of $130 now, for a total of $1073.08.  But they were able to dump it right into the front yard, which put it where it needed to be.


This was followed by several days of spreading the dirt around, trying to level the front yard.


But the front yard is now ready for planting.

There is one problem -- the dirt was dumped right smack on top of one of the sprinkler heads.   But after spreading the dirt out, the head could be easily located by turning on Zone 10, and the missing head pops right up!


And we had a bit of dirt left over for the spot where the Monterey Oak had been.


and to try to smooth out the slope of the lawn where it had been too steep.