Sunday, May 27, 2012

Stone Edging for the Extended South Bed

We excavated down to bed rock. Near the fence that was not too far down; near the raised garden we were down a couple feet.

When they put the utilities in as the neighborhood was developed, they cut a trench into the rock down a couple of feet, put the telephone, cable, and electrical lines in it, filled it partly with sand, and then pushed dirt and rock in to fill it back up. This trench runs about 17 to 19 inches from the fence, and is 6 inches wide. If we figure the fence is 1 inch thick, plus 4x4 posts, then the trench runs about 24 inches from the property line.


The idea is to leave the rock between the fence and the trench, and use it as a base for the cement wall that edges the yard. Once we have that wall in place, we will then excavate the rock on the other side of the trench, to give us plenty of soil depth for the South bed.

So first, we frame up for the concrete, using masonite boards spaced with 1x4's, held in place by sacks of compost and manure.


Then we pour the concrete. This section took 15 bags of 60-pound concrete mix. Removing the framing the next day, we have our cement wall.


With one 80-pound bag of mortar mix, we can put the limestone rocks on top to give a finished look. Experimentally, during the process of mixing concrete, mortar and cleaning up afterwards, we can all see that this holds water.


Now we can fill in the section behind the greenhouse -- we've already removed the rock from this section, and we can work then on removing the rock around the base of our oldest olive tree (without upsetting it).

Friday, May 11, 2012

Digging in an Extended South Bed

With the rock wall in place, we have an extended definition of the South Bed.


The old South Bed stopped at a line from the raised bed to the fence that goes thru the middle of the greenhouse. Now it extends further west, to the rock wall, and is no longer rectangular. In addition to the sort of trapezoidal shape, it has the oldest olive tree, the greenhouse, the two shin oaks and one of the newer olive trees.

But not all of it has been excavated, particularly the area between the rock wall and the greenhouse.


So the first problem is to dig out all the rock and dirt to get down to bedrock. This produces a bunch of rubble rock, and a couple big rocks.


In addition, we use the jack hammer to break up the rock between the greenhouse and the fence.


The big rocks are taken around to the curb to get rid of.

In addition, Linda says she doesn't like the ring of rocks at the base of the shin oaks on the other side of the South bed.


So these are also hauled out to the curb.

Friday, April 13, 2012

Removing Popcorn from Dining Room and Guest Bedroom


The weather has been nice for digging outside, but it's also been almost pleasant enough to leave the windows open both night and day -- actually a bit too warm in the daytime (up into the 80's), but not bad. This is probably only a temporary situation however. Soon we will need to keep the house closed up and air conditioned.

But it's been obvious that the hardwood floor in the dining room needs to be re-finished. And I had been intending to remove the popcorn from the ceiling in the guest bedroom and then paint the walls and ceiling. Both of these will be easier to take if we can leave the windows open to allow the paint to dry and air out. So now is the best time to do this, at least until October or November.

And to refinish the floor in the dining room, I have to move all the furniture out. As long as it is out, I may as well remove the popcorn from the dining room ceiling and paint the walls. And as long as I have the furniture out of the guest bedroom, I can refinish the floors.

So two rooms, the same process: remove the popcorn, texture the ceiling, paint the ceiling, paint the walls, sand and re-finish the floor.

Monday, I put down plastic on the floor, and taped it up to the baseboards. Then I hung plastic down the walls and taped it right up to the ceiling. Once this was done, I removed the popcorn from the ceiling in the dining room. This involved wetting it down to make it soft enough to scrape off with a hard plastic trowel. I brought in a garden hose from outside, with a hand sprayer set on "Mist" to spray the water on the ceiling.

The dining room is sort of a sloped tray ceiling -- the walls go up 8 feet and then there is a 2 foot section at a 45 degree slant to the horizontal ceiling. This gives the room somewhat higher ceilings without having walls that are not a standard 8 foot height. Plus the slanted part matches the roof joists on the outside walls.

The slanted part was harder to work with since the water would tend to run down the slant towards the walls. The water on the horizontal part pretty much just stayed there.

The easiest thing to do was to just scrape the popcorn ceiling off and let it drop on the floor (which was covered with plastic). After the ceiling was all done, then it had to be scooped up off the floor. And the plastic on the walls was also covered with a wet popcorn/drywall-compound mix. It was easiest to just take that plastic down, roll it up and throw it away. I tried to clean it for re-use, but it was wasn't really possible.

Tuesday morning, I repeated this in the guest bedroom. The guest bedroom is somewhat smaller (12 feet by 12 feet) and the ceiling is all flat.


Tuesday night I went over to my daughter's place and borrowed her husband's tools for texturing drywall: an air compressor, a hopper for holding and spraying the drywall compound, and a big blade for flattening the half-dried drywall compound.

Wednesday I textured the ceilings.

Texturing the ceilings involves mixing up a thick soup/gravy consistency of drywall compound (mud), and spraying it on the ceiling. This creates lots of little lumps of drywall compound. Let it dry for 15 to 20 minutes until it starts to harden, then run the big trowel over this to flatten everything down -- a "drag" texture.

I had never done this before, and had problems with too runny a mixture when I started, but by the second room I thought I was doing okay.

By Thursday, I painted both ceilings with a simple pure white primer. At this point, you can actually see how well (or poorly) you've done. I should have learned on someone else's house first.

On Friday, I put the final coat of paint on the ceilings. Linda had picked out "heavy cream" from Martha Stewart Living(MSL058) for the ceilings. I got two gallons from Home Depot for the ceilings.

Linda picked "hemp" (MSL229) for the walls. I got the wall paint up in the dining room on Friday afternoon. It took a bit more than a gallon to do the dining room walls.

Saturday I painted the guest bedroom walls.

Also, I went back to the dining room and repainted part of it. The sloping part of the ceiling can be considered either part of the ceiling, or part of the wall. Kat and Linda had suggested painting the sloped part to match the wall, rather than the ceiling. I used masking tape to try to get a nice straight line and repainted the sloped part in "Hemp".

After all this, I was able to remove all the plastic -- from the walls and the floors. The walls and ceiling are done, so the ceiling fans and light switch plates and outlet plates can be put back on.

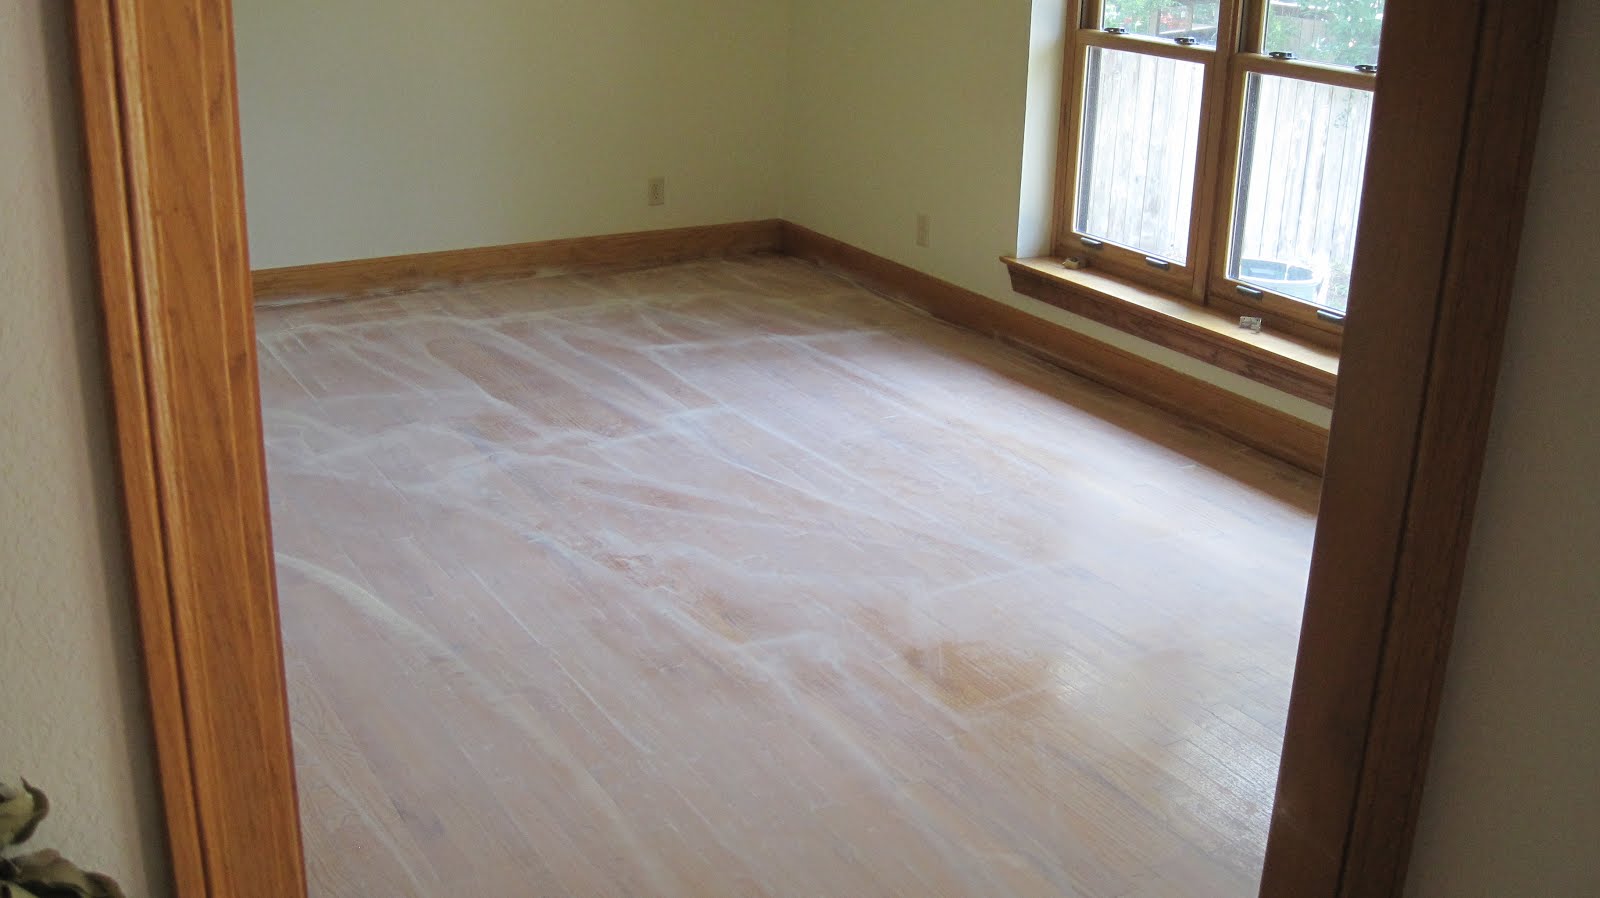
To refinish the floors, on Monday, I rented a sander and sanded the dining room and guest bedroom floors. I started with 120 and later with 150. The idea is to get part of the polyurethane finish off, but not the wood itself. After sanding, I used a 150 grit sandpaper by hand to sand the baseboards.


Then we need to vacuum completely, and I mopped it with clean water in a bucket with a rag.

Tuesday morning, I went over the rooms with a rag and paint thinner, to get up all and any dirt and dust. Then I coated it with polyurethane. I did the baseboards first, with a brush, and then the floor itself with a lambs wool
applicator. (I think this was a mistake since afterwards I found a lot of stuff in the polyurethane that I think came from the lambs wool; I should have used a brush).


Wednesday and Thursday was letting the floors dry. On Friday, we put the furniture back in the rooms.

In all, it took 2 weeks to redo these two rooms, with the windows open almost all this time.

Friday, April 6, 2012

Filling the North Bed with Lavender

None of the lavender seeds that I planted came up. After about a month, nothing was growing. So I gave up on the seeds and went to buy plants to put in place.

We had one plant that I bought last year and put in a corner of the raised bed until the North Bed was ready. That plant is doing really well. So I transplanted it from the raised bed to the North Bed.

Barton Springs Nursery had a wide variety of lavender in little plastic pots. I bought eleven plants -- two of each, except for one Hidcote which had no other. Then I stopped at Lowe's and Home Depot. They only had a Goodwin Creek variety, so I got 3 more of those. HEB today had another variety -- Fernleaf -- and I bought one of those.

The different varieties are scattered around the bed, as shown below.


The various varieties are listed below:


Linda has asked for some space in the North Bed for something other than lavender.

Saturday, March 17, 2012

A Greenhouse for the backyard

A neighbor moved and the new people did not want their backyard greenhouse, so they past it on to us. This greenhouse is a light-weight aluminum frame with a bunch of glass panels. It took us about two hours to remove all the glass and move the frame from their backyard to ours.

This is apparently Model 86 "Curved Greenhouse", probably from Halls Garden Products, Ltd. Aylesford, Kent, England, originally from 2004.

The first problem was figuring where to put it. We tried moving the frame around several places in the backyard, and finally decided it should go next to the South Bed, behind the stone wall and next to the raised garden. This area is shaded by several trees, but they are deciduous so they drop their leaves in the winter and so things should be sunny in the winter and more shaded in the summer.


The next problem is setting up a foundation. Since the placement of the greenhouse is still subject to change, I decided to use a relatively temporary foundation -- a box of wooden beams. The more permanent option would be a concrete slab, but that would make it hard to move. Instead I got eight 4x6 pressure treated timbers (YellaWood) from Home Depot ($132,37). The foundation box should be 101.5 by 76 inches, and I was able to get Home Depot to cut the 8-foot timbers to the correct lengths. I assembled the foundation in the garage and used 6 inch lag screws to hold them all together.


Next I had to level the ground where the greenhouse would go. The back of the greenhouse is at ground level, so the front is below ground, about 4 inches, since the ground slopes back.


After digging it out level from front to back and side to side, I poured sand (6 bags) along the edges. The idea is that the sand is easier to shift to get the foundation box level. I took the box from the garage and re-assembled it in place.


I covered the entire inside with weed barrier, running both front to back and side to side. I filled the bottom two inches of the box with decomposed granite, and then topped it off with 5 to 6 inches of rainbow gravel, from Whittlesey.

To get the rainbow gravel, which ended up being almost a ton of gravel, I rented a pick-up from U-Haul again. My calculations suggested 1/2 a ton would be enough, but after one load, it was clear I was significantly off and only had, at best 2/3 of what I needed, so I made another trip and got another 1/2 ton. The actual numbers were 1140 pounds the first trip ($66.02) and 980 pounds the second ($42.43). The pick-up rental was $55.45 plus $13.05 in gas, and $1.50 to wash out the pick-up bed.


Once this was done, we just have to put the glass back on the frame. The assembly book from the manufacturer shows how the various size panes should be installed.


We had some breakage of panes in moving and cleaning, and had to buy 5 replacement panes ($48.66). The easiest place to do this was at The Hardware Store, since the big box stores -- Home Depot and Lowe's -- don't cut glass. But the Hardware Store only had single thickness glass, and it seems the glass being replaced is somewhat thicker (maybe double strength glass). Next time we should try an actual glass shop.

The panes are held in place by little clips and "glazing spring clips". Both of these are normally grey metal, and if you drop one (or it springs off), it can be hard to find. To make it easier, I spray painted them yellow.

But after a day of washing glass and putting it up, we have it all in place.

Fixing a Leaky Faucet

We have hoses attached to all the exterior faucets -- one in each corner of the house. The main one for the garden appears to have been leaking -- a slow drip -- for the past year, so I figured this would be a good time to fix it.

Unfortunately, when I went to take the top off of the faucet, to replace washer, the faucet all but fell apart. The handle shattered into 5 or 6 pieces, and the base would not come off. Of course, Home Depot (where I bought the original faucet) no longer carries this brand, so there are no replacement parts.

And the copper pipe that it was attached to wanted to turn, rather than letting loose of the faucet.

Given that it was likely that I would break the pipes, I figured it was better to call an actual plumber. I chiselled out the mortar around the faucet and the pipes. This exposed a connection which the plumber says is an electrical grounding connection.

Lanier Plumbing sent a guy out who did an excellent job. He put an extension on the pipe that converted it from male threads to female threads, and should be more durable, plus being longer. That should make it easier to replace the faucet in the future. $122.88 for an hour's worth of work plus the faucet (male hose bib).


I still have to repair the mortar.

Tuesday, March 6, 2012

Dirt delivered

The dirt was delivered this afternoon, about 3:30. Three cubic yards.


I ordered more than was needed for the North Bed itself; I only put about 2 inches in depth on the North Bed, which comes out to about 1.2 cubic yards. But the minimum delivery is 3 cubic yards.

I put the rest on either side of the walkway, in Zone 2 or in the part that will become the lawn. Areas that had already been dug up, and have settled. I can either leave it there, long-term, or eventually transfer it somewhere else when that area is finished.


It took about 2 and a half hours to haul it all from the street to the back yard and distribute it around.


It's supposed to rain in the next couple of days, so I wanted to get this in before it rained.

The North Bed has an olive tree in the middle. My idea is to carpet the rest of it with lavender. Lavender is a perennial, so it will be there year after year. It is supposed to be hardy and drought-tolerant.

I bought 4 or 5 packs of lavender seeds from Amazon.com, and then planted them in areas of the North Bed. The instructions say they will germinate in about 20 days.

Building the Stone Wall

We have dug up a bunch of rocks. Linda thought we should keep them, so I piled them in the back yard.


From that Linda got the idea of building a rock wall separating the South Bed from the lawn.

We started at the end near the fence, selecting rocks that were big enough and shaped for stacking. We scattered the rocks over the yard, to make it easier to see each one.


We continued across the yard to meet the corner of the walkway at the raised garden. The idea was to make the wall two or three rocks high. It took about two days of moving, selecting, positioning.


We've moved the surplus rocks out to the front curb, to get rid of them.

Saturday, March 3, 2012

North Bed Drip Irrigation

I want to get my lavender planted in the North Bed, and before I do that, I should put in the irrigation. I have a supply line already run to the corner of the bed. I want to use the underground drip irrigation, like I did in the herb and iris beds.

First, I have to clear off the bed. Over the winter, I had bags of manure and rocks stacked on it, and Linda had put the leaves from the trees there. I moved all that off and cleared it to just the bed.


I measured the bed and laid out where the drip irrigation lines would go. The lines are 18 inches apart. I used examples from the Rain Bird documents on underground drip irrigation. I still had plenty of the drip lines from when I put it into the iris and herb beds. The Rain Bird document suggests a supply line up one side and a flush line at the other end. A valve at the end can be opened to flush out the lines, or closed to allow the drip.


With this layout, I can now see how many joints of what type, to buy the necessary connectors.

Then it is a day of cutting and connecting to create the irrigation system.


At the corner, where the supply line comes in, I put in a filter and pressure regulator. Since I may need to clean the filter, I put these two in a box.


At this point, it became obvious that the final connection between the output of the pressure regulator and the rest of the system would need to be made at the right height (or depth) underground. My plan was to put the drip lines 4 inches underground and then add 2 inches of really good dirt on top of the bed. This would give a good soil mix to start the lavender plants. So I needed to bury the entire irrigation system 4 inches under the ground.

While that was doable, with difficulty, it was the most complicated and difficult of the tasks for this job. In retrospect, I should have dug the trenches into the bed first (4 inches deep) where I wanted the drip lines to be, and then assembled everything in the trenches.

But in any case, I got the lines buried, and was able to make the final connection between the irrigation supply line and the array of drip lines.


Once that was done, I could bury the whole thing.


I'm ready now for 2 inches of good dirt on top of this bed. Given the size of the bed, this works out to about 1.2 cubic yards.

I had previously bought Grower's Mix from Austin Landscape Supplies for the raised bed, and that seems to have worked well. So I ordered another 3 cubic yards (minimum delivery order) of Grower's Mix ($35/cubic yard) plus delivery ($70) plus tax for a total of $189.43 to be delivered on Tuesday. This should be 40% compost, 20% sand, and 40% loam.

I also considered Hill Country Garden Soil from John Dromgoole's Natural Gardener, but at $46/cubic yard, it's more expensive, and the web site doesn't really say the blend. Whittlesey Landscape Supplies (where I have been getting the decomposed granite and rocks) has a Garden Mix, but it's only 33% compost, 22% sand, and 45% loam (plus delivery is more).

Saturday, February 18, 2012

Shelves in the Utility Room

While I was away, Linda got a new dog. The dog needs lots of new things -- food, toys, stuff. Since the dog gets fed in the utility room, she put them all on the dryer. That's okay for short term, but longer term, we need a place to put them.

So in looking at what we have, it seems that most of the space where the freezer would go is being wasted. We don't have a freezer, and don't expect to, so the space for the freezer is mainly just laundry baskets and a small shelf on the side wall. Our solution was to take the small shelf off, and put in two new shelves -- running the full width of the space -- 40 inches wide. To leave room for hanging clothes, we only put in 12 inch deep shelves, and to leave plenty of room, the top shelf is 14 inches below the shelf above it, and the bottom shelf is 11 inches below that. We bought one 8 foot length of shelving and cut it to two 40 pieces (plus a left-over).


We moved the previous little shelf over onto the wall next to the dryer, so we can use the hook rack beneath it.


We also got a new support for the iron and ironing board, and moved those
over a bit.

Once that had settled in, we went back and got another hock rack to put next to the new shelves. We wanted to get a white wire one, but couldn't find a simple white wire set of hooks. This particular one is $20 from Target.


Putting this hook rack up was fairly easy -- there is a stud behind both supports. But whoever designed it was an idiot. Look at how the screws that hold it to the wall have to be. Putting in the top screw is easy, but the bottom screw has the first hook, and the rack right in front of it. How can you possibly use a screw driver to put the bottom screw in?


I used a Phillips head screw bit and a crescent wrench to turn it.